
FREE UK DELIVERY
ON ALL ORDERS
-
Exterior
-
Interior
Featured
- Hybrid Solutions
-
Car Care Kits
Collections
- Accessories
-
REWARDS
Earn Points Today
-
Trade Portal
Wholesale Partnerships
- Home
-
Exterior
- Buy One Get One Free Deals
- New
- Best Sellers
- Problem Solvers
-
Wash
- extreme foam
- heavy duty cleaners
- wash & wax one step
- waterless
- pre-wash valeting range
- wash valeting range
- ph neutral car wash
- car windscreen cleaner
-
Wax, Seal & Coat
- coatings
- detailer
- liquid
- one steps
- paste
- sealants
- spray
- wax speciality
- spray wax and sealant valeting range
- Paint Correct
-
Restore
- bug & tar removal
- headlight restoration
- metal & chrome finish
- restore scratch repair
- restore speciality
- trim restoration
- Wheel & Tyre
-
Interior
- Buy One Get One Free Deals
- New
- Best Sellers
-
Cleaners & Disinfectants
- interior detailers
- disinfectant
- protectants
- heavy duty cleaners
- multipurpose cleaners
- interior valeting range
- Carpet, Mats & Upholstery
- Leather Care
- Odour Elimination
- Glass
- Hybrid Solutions
- Car Care Kits
- Accessories
- Rewards
- Learn
- Trade Portal
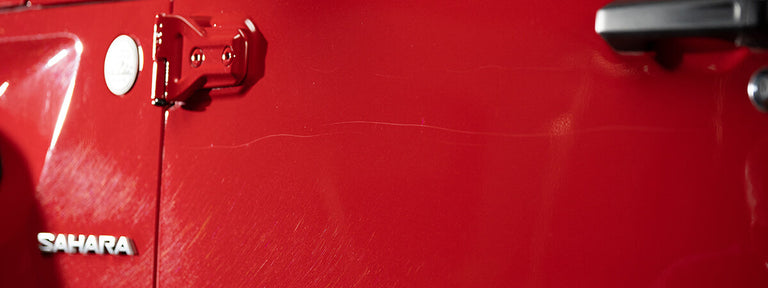
How To Use A Car Paint Scratch Remover
In this article, you will learn:
- How to tell if you can use car paint scratch remover to fix your clear coat
- How to remove light scratches from car paint easily
- How to remove a surface scratch or paint transfer safely
- How detail shops blend freshly restored paint with the surrounding area for a seamless finish
Tree branches, car doors, shopping carts – these are just a few of the threats your car’s paint faces every day. Inevitably, no matter how carefully you drive or where you park, you’ll end up with light scratches, swirl marks or paint transfer on the car surface. If you’re anything like us, the especially conspicuous ones gnaw at you every time you see them. If only there were a way to fix those without repainting your car…
Don’t despair! We just might have a solution for you. If the damage isn’t too severe, you can repair a scratch or scuff marks quickly, safely and easily at home. Simply pick up some microfiber towels and a DIY scratch repair product and set aside 15 minutes. We’re about to explain how to make that damage disappear like magic!
Test the damaged area
Determining if you can repair your scratched or scuffed paint is easy. Gently run a fingernail perpendicular across the damage. If your nail passes over the area without resistance, it’s something you can repair at home. If deeper scratches catch your nail, you may need help from a professional detailer or repair shop.
If you have paint transfer, which is when one painted surface rubs its paint colour onto your car, you can fix this at home, too. This can happen when the door of a parked car brushes your car but doesn’t ding it or if you accidentally brush against something like a painted pole in a car park. No matter how it happened, we’ll help you fix it.
A fast fix
A DIY product, like our Scratch Repair & Renew, can help you fix light to moderate paint damage from scratches, scuffs and paint transfer. Depending on the damage, type of clear coat and paint colour, you may repair the finish in 5 minutes, or it may take up to 20 minutes. We advise customers to set aside 30 minutes for each repair and exercise patience. This will allow you to let the product do the work instead of rushing and perhaps applying too much pressure on the clear coat as you work.
Prepping the area
We recommend thoroughly washing and drying your car before performing any paint correction. This will help you avoid scratching the clear coat further with embedded contaminants. In this case, because you’ll be working on an isolated scratch instead of the entire car, you may choose to wash and dry only the area where you’ll be working. Keep in mind, though, that washing and drying the whole car will allow you to inspect for other damage that may have gone unnoticed. Taking the extra time to find and repair all scratches could be time well spent.
If you find several scratches and swirls around the car, we’d encourage you to set aside the scratch repair product and switch to a polishing compound or rubbing compound to restore your entire paint job. We recommend Hybrid Solutions Pro 1 & Done as the ultimate compound.

Testing the damage
Try the fingernail test that we described previously. If your nail glides over the damage, proceed with your repair. If not, consider asking a detailer or repair shop for an estimate.

Removing the scratch or scuff
Squeeze a small dot, about 2 cm, of scratch removal liquid onto a clean, folded microfiber cloth or foam polishing pad and apply it over the scratch in a gentle, circular motion. Don’t apply much pressure. Let the polishing agents do the work for you. If it’s a long scratch, work your way down the length, applying additional scratch remover to your cloth if necessary. Fold your microfiber cloth to a clean side and wipe away any excess product.
Look closely to check your work. If the scratch is gone and the repair appears seamless with the surrounding area, you’re finished! If the scratch is still visible, repeat the steps until the scratch vanishes. Remember to be patient and let the product do the work.
It’s rare, but sometimes, several passes will not completely remove a scratch. Don’t worry, we have a solution for that. You can fill the scratch with a small amount of color-matched touch up paint. After the paint dries, use Scratch Repair & Renew to level and blend the finish using the same application steps above.
Pro Tip: Repairing a scratch with polish can leave the area shinier than those around it. Something may appear “off” about that spot. If so, just use the same polishing technique with a feather touch to blend the finish of the treated area with the surrounding paint. In seconds, no one will know you ever had a scratch there.
The speedy route
Scratch Repair & Renew works quickly even when you do the job by hand, but a dual-action polisher will make it even easier. With just four small drops on your cutting pad, buff the scratched area lightly on low speed. If needed, increase the RPMs as you work over the scratch. When the scratch is gone, blend the treated and surrounding areas and use a clean microfiber cloth to wipe away any residual product.
In minutes flat, you’ll say so long to that scratch (and that nagging irritation) forever. That’s time well spent in our books.
Featured in this article
Scratch Repair & Renew
£8.50
- Removes light to heavy scratches, swirls, water spots and paint contamination
- Self-aligning precision platelet technology repairs damage while safeguarding against new, smaller scratches and swirls
- Heal & Seal Technology applies a layer of sealant over the restored area for lasting protection without additional wax
- Repair your scratches, don’t mask them – the results won’t wash away as with some products
- Auto Express – Product Awards Winner for 2020
-
 Low Stock


Hybrid Solutions Pro 1 & Done Professional Polishing Compound Correct & Finish™ 473ml
£17.50
- BUY ONE GET ONE FREE AVAILABLE FOR A LIMITED TIME - Simply add to cart
- Can not be used in conjunction with any other discount code
- Performs as a heavy-duty compound or a light polish depending on which pad you use
- Infused with aluminum oxide abrasives for up to 1000 grit cutting strength
- Precision polishing platelets glide gently over your car exterior to prevent additional scratches and swirls
-
Low Stock

Rubbing Compound Heavy Duty Cleaner 298g
£7.00
- Polishing agents work fast to remove swirls, scratches, scuffs, oxidation and paint transfer
- Heavy-duty cleaning formula removes stains and moderate scratches and imperfections
- Safe for clear coat without burn-in
-
Low Stock
Scratch Repair & Renew
£8.50
- Removes light to heavy scratches, swirls, water spots and paint contamination
- Self-aligning precision platelet technology repairs damage while safeguarding against new, smaller scratches and swirls
- Heal & Seal Technology applies a layer of sealant over the restored area for lasting protection without additional wax
- Repair your scratches, don’t mask them – the results won’t wash away as with some products
- Auto Express – Product Awards Winner for 2020
-
Low Stock

Hybrid Solutions Pro 1 & Done Professional Polishing Compound Correct & Finish™ 473ml
£17.50
- BUY ONE GET ONE FREE AVAILABLE FOR A LIMITED TIME - Simply add to cart
- Can not be used in conjunction with any other discount code
- Performs as a heavy-duty compound or a light polish depending on which pad you use
- Infused with aluminum oxide abrasives for up to 1000 grit cutting strength
- Precision polishing platelets glide gently over your car exterior to prevent additional scratches and swirls
-
Low Stock
Rubbing Compound Heavy Duty Cleaner 298g
£7.00
- Polishing agents work fast to remove swirls, scratches, scuffs, oxidation and paint transfer
- Heavy-duty cleaning formula removes stains and moderate scratches and imperfections
- Safe for clear coat without burn-in
-
Low Stock
WANT MORE TURTLE WAX?
Subscribe for your newsletter and the rewards will be in your inbox before you even get there
Latest
News, events and insights from Turtle Wax® worldwide
Offers
Exclusive offers and discounts on Turtle Wax® products
Rewards
Regular treats and surprises for all subscribers
Thanks! You should receive a confirmation email shortly.